These French macarons make a very special treat to give your friends and family. They also look pretty on a plate for guests to indulge in when they come over. They can definitely be finicky but once you learn how to make macarons you’ll be hooked!
Even if your macaron cookies come out of the oven looking totally wrong they’ll still be delicious if not picture perfect. If you have extra almond flour then try my homemade almond cookies!
Egg Whites- Make sure the weigh them using a kitchen scale. Aging egg whites for macarons is an important step. Separate the eggs, place the whites in a clean glass, cover with plastic wrap with a few holes poked in and let them hang out in the fridge for a few days before using. This will dehydrate them and make them perfect for macarons. This step isn’t a must do but a bunch of little things can add up to a big difference when making these cookies.
Almond Flour- Almost all brands will say “super-fine” but you will still need to sieve and process them to be even finer, so don’t stress out at the market it will all work out.
:max_bytes(150000):strip_icc()/easy-macaron-recipe-435221-hero-01-b3680f676df64f5ab2c1e65976c0e945.jpg)
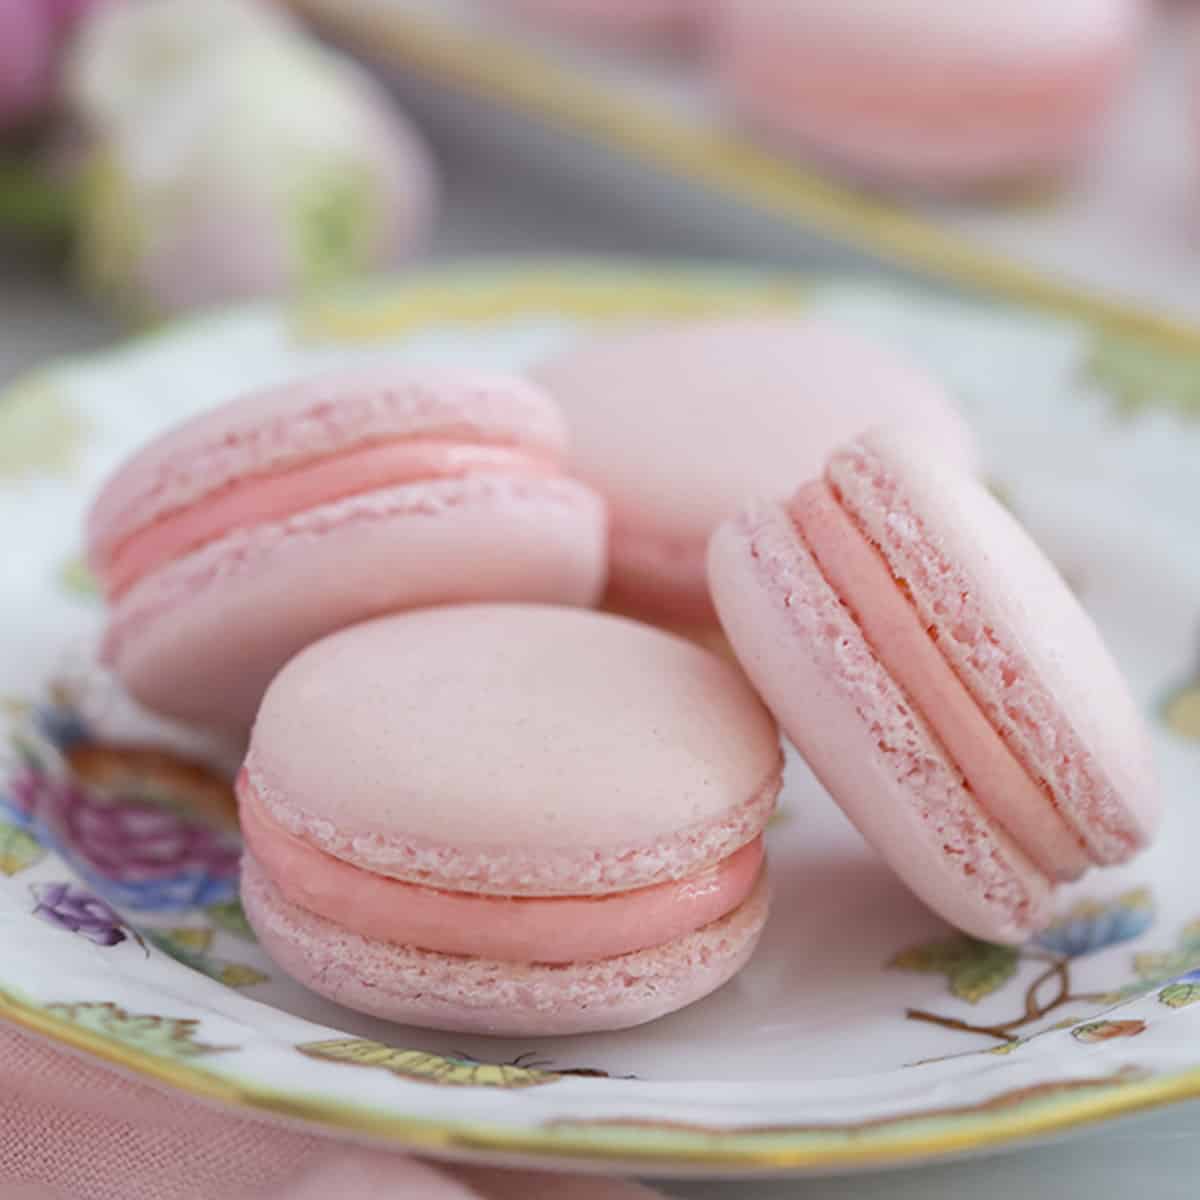
French Macarons

Review this page, video, troubleshooting, and success tips and follow the recipe precisely for crisp, chewy, delicate French macaron cookies. Have fun with fillings! I provide some filling ideas in the recipe notes. We strongly recommend using gram measurements, but see recipe note if you do not have a kitchen scale.
Prep: 1h
Total: 1h30min
Yield: 40
Ingredients:
- 100 g egg whites (usually between 3-4 large egg whites)
- 1/4 teaspoon (1g) cream of tartar
- 1/2 teaspoon extract such as vanilla, almond, coconut, etc (optional)
- 80g superfine sugar (aka caster sugar, see note)
- 1-2 drops gel food coloring (optional)
- 125g almond flour
- 125g confectioners’ sugar
- desired macaron filling (some options listed in notes)
Instruction:
- Wipe down a large glass or metal mixing bowl with lemon juice or vinegar. Add egg whites. Cover and refrigerate for 24 hours, then bring to room temperature.
- Line 3 large baking sheets with silicone baking mats or parchment paper. Set aside.
- Add cream of tartar and extract (if using) to egg whites. Using a handheld mixer or stand mixer fitted with a whisk attachment, beat together on medium speed until very soft peaks form. This takes a few minutes of beating. At first the egg white and cream of tartar mixture will be foamy, then the bubbles will begin to tighten and the beaters will leave tracks as the egg whites build volume. Once they begin leaving tracks, you likely have soft peaks. Stop beating. Add about 1/3 of the superfine sugar. Beat on medium-high speed for 5 seconds, then with the mixer continuing to run, add another 1/3 of the sugar. Beat for 5 seconds, then with the mixer continuing to run, add the remaining sugar. Beat on medium-high speed until stiff glossy peaks form. (This means the whites have stiff, smooth, and sharp points in the bowl or on the lifted whisk attachment/beaters. Stiff peaks do not droop down. You can turn the bowl upside down and the egg whites will not move or spill out.) Using a rubber spatula, slowly and gently fold the food coloring (if using) into the egg whites.
- Sift the almond flour and confectioners’ sugar together in a large glass or metal mixing bowl. Use a spoon to help work any larger pieces through the sieve. You don’t want to discard a lot of that because then you won’t have enough dry ingredients in the batter.
- Slowly fold the beaten egg whites into the almond flour mixture in 3 separate additions, folding until combined before adding the next addition. After you add all of the egg whites, pay very close attention to the consistency of your macaron batter. Continue folding the batter (which deflates air) until it thins out into the consistency of honey. What’s a more helpful cue is the figure 8 test. Drop the macaron batter off of your spatula in the form of a figure 8. The figure 8 should take no more than 10 seconds to sink back into itself. If it takes less, your batter was overmixed and is too thin. If it takes longer, continue slowly folding the batter to deflate more air, then perform the figure 8 test again. It’s best to go very slow so you don’t accidentally overmix.
- Spoon the macaron batter into a piping bag fitted with a medium round piping tip, such as Wilton 12, Wilton 1A, or even Ateco 806. The macaron batter is very drippy, so transferring to the piping bag can be messy.
- Holding the piping bag at a 90 degree angle over the baking sheet, pipe batter in 1.5 – 2 inch rounds about 1-2 inches apart on prepared baking sheets. I usually pipe little mounds—see video tutorial above. The piped macaron batter flattens out. Bang the pan a couple times on the counter to pop any air bubbles, then use a toothpick to pop any remaining air bubbles.
- Let the piped macarons sit out until they are dry and no longer tacky on top, usually 30-60 minutes. This time allows the top to firm up and form a skin, which helps the macarons rise UP and form their trademark ruffly “feet.” Do not let them sit out for longer than they need to because they could begin to deflate.
- Meanwhile, preheat the oven to 325°F (163°C).
- Bake for 13 minutes. As the macaron shells bake, they should form feet. To test for doneness, lightly touch the top of a macaron with a spoon or your finger (careful, it’s hot). If the macaron seems wobbly, it’s not done and needs another 1-2 minutes. If it seems set, it’s done. Basically, bake until the macarons don’t move around when touched.
- Let the shells cool on the baking sheet for 15 minutes, then transfer to a cooling rack to continue cooling. The macaron shells may stick to the parchment paper/baking sheet if you try to remove them too early. If this is happening, let them cool on the baking sheet a little longer before removing.
- After cooling, the shells are ready to fill and sandwich together. I have plenty of filling suggestions in the recipe notes below. You can spread filling with a knife or pipe it using the same round tip you used for the macaron batter.
- You can eat right away or, as some professionals prefer, cover and refrigerate them 12-24 hours so the macarons and flavors can mature. Bring to room temperature before serving. (I usually just serve them right away!)
- Cover leftover macarons and refrigerate for up to 5 days.
Macaron recipe
These elegant, delicate, and delicious french macarons are the perfect treat for your next get together!
Prep: 15min
Total: 40min
Yield: 36
Serving Size: 11 g
Nutrition Facts: servingSize 11 g, calories 63 kcal, Carbohydrate 6 g, Protein 0.8 g, Fat 1.9 g, Saturated Fat 0.7 g, Cholesterol 0.7 mg, Sodium 18 mg, Fiber 0.5 g, Sugar 5.2 g
Ingredients:
- 100 g egg whites (room temperature 3 large eggs)
- 140 g almond flour (1 1/2 cups)
- 90 g granulated sugar (just under 1/2 cup)
- 130 g powdered sugar (1 cup)
- 1 tsp vanilla (5mL)
- 1/4 tsp cream of tartar (800mg)
- 1 cup unsalted butter softened (226g)
- 5 egg yolks
- 1/2 cup granulated sugar (100g)
- 1 tsp vanilla
- 3 tbsp water (30mL)
- 1 pinch salt
Instruction:
- Bake at 300F for 12-15 minutes, rotate tray after 7 minutes. Allow to cool completely before removing from baking sheet.
- Add in butter one cube at a time allowing each piece to incorporate before adding the next. Add vanilla and salt. Continue mixing until buttercream is smooth and creamy. (About 5-6 minutes.) Add food coloring if desired.
- Pipe your filling onto the back of half the shells. Form a sandwich and repeat. Macarons should be aged in the fridge for 1-3 days for best results. This allows the filling to soften the shells inside.
French Macarons
This delicious macaron recipe from Food Network Kitchen is sure to impress. Share with guests, or keep this sweet French treat all to yourself!
Total: 0 2h30min0
Yield: 36 macarons
Nutrition Facts: calories 65 calorie, Fat 2 grams, Saturated Fat 0 grams, Cholesterol 0 milligrams, Sodium 14 milligrams, Carbohydrate 12 grams, Protein 1 grams, Sugar 11 grams
Ingredients:
- 1 3/4 cups confectioners’ sugar
- 1 cup almond flour
- 3 large egg whites, at room temperature
- 1/4 teaspoon cream of tartar
- Pinch of salt
- 1/4 cup superfine sugar
- 2 to 3 drops gel food coloring (see options below)
- 1/2 teaspoon vanilla, almond or mint extract
- Assorted fillings (see options below)
Instruction:
- Preheat the oven to 320 degrees F. Line 3 baking sheets with silicone mats or parchment. Measure the confectioners’ sugar and almond flour by spooning them into measuring cups and leveling with a knife. Transfer to a bowl; whisk to combine.
- Sift the sugar-almond flour mixture, a little at a time, through a fine-mesh sieve into a large bowl, pressing with a rubber spatula to pass through as much as possible. It will take a while, and up to 2 tablespoons of coarse almond flour may be left; save for another use.
- Beat the egg whites, cream of tartar and salt with a mixer on medium speed until frothy. Increase the speed to medium high; gradually add the superfine sugar and beat until stiff and shiny, about 5 more minutes.
- Transfer the beaten egg whites to the bowl with the almond flour mixture. Fold in the egg whites by drawing a rubber spatula halfway through the mixture and folding until incorporated, giving the bowl a quarter turn with each fold.
- Add the desired food coloring and extract (see below). Continue folding and turning, scraping down the bowl, until the batter is smooth and falls off the spatula in a thin flat ribbon, 2 to 3 minutes.
- Transfer the batter to a pastry bag fitted with a 1/4-inch round tip. Holding the bag vertically and close to the baking sheet, pipe 1 1/4-inch circles (24 per sheet). Firmly tap the baking sheets twice against the counter to release any air bubbles.
- Let the cookies sit at room temperature until the tops are no longer sticky to the touch, 15 minutes to 1 hour, depending on the humidity. Slip another baking sheet under the first batch (a double baking sheet protects the cookies from the heat).
- Bake the first batch until the cookies are shiny and rise 1/8 inch to form a “foot,” 12 to 14 minutes. Transfer to a rack to cool completely. Repeat, using a double sheet for each batch. Peel the cookies off the mats and sandwich with a thin layer of filling (see below).
- Almond-Raspberry:
- Tint the batter with 2 drops neon pink gel food coloring; flavor with almond extract. Fill with seedless raspberry jam (you’ll need about 3/4 cup).
- Mint-White Chocolate:
- Tint the batter with 2 drops mint green gel food coloring; flavor with mint extract. For the filling, microwave 3 ounces chopped white chocolate, 2 tablespoons heavy cream and 1 tablespoon butter in 30-second intervals, stirring, until smooth. Stir in 1/4 teaspoon mint extract and 1 drop mint green gel food coloring.
- Blueberry Cheesecake:
- Tint the batter with 3 drops royal blue gel food coloring; flavor with vanilla extract. For the filling, mix 4 ounces softened cream cheese and 3 tablespoons blueberry jam.
- Lavender-Honey:
- Tint the batter with 2 drops violet gel food coloring; flavor with almond or vanilla extract. For the filling, mix 3/4 cup mascarpone cheese, 2 tablespoons honey and 1 teaspoon ground dried lavender.
- Pineapple:
- Tint the batter with 2 drops lemon yellow gel food coloring; flavor with vanilla extract. For the filling, press 3/4 cup pineapple jam through a sieve, discarding any large pieces.
French Macaron Recipe
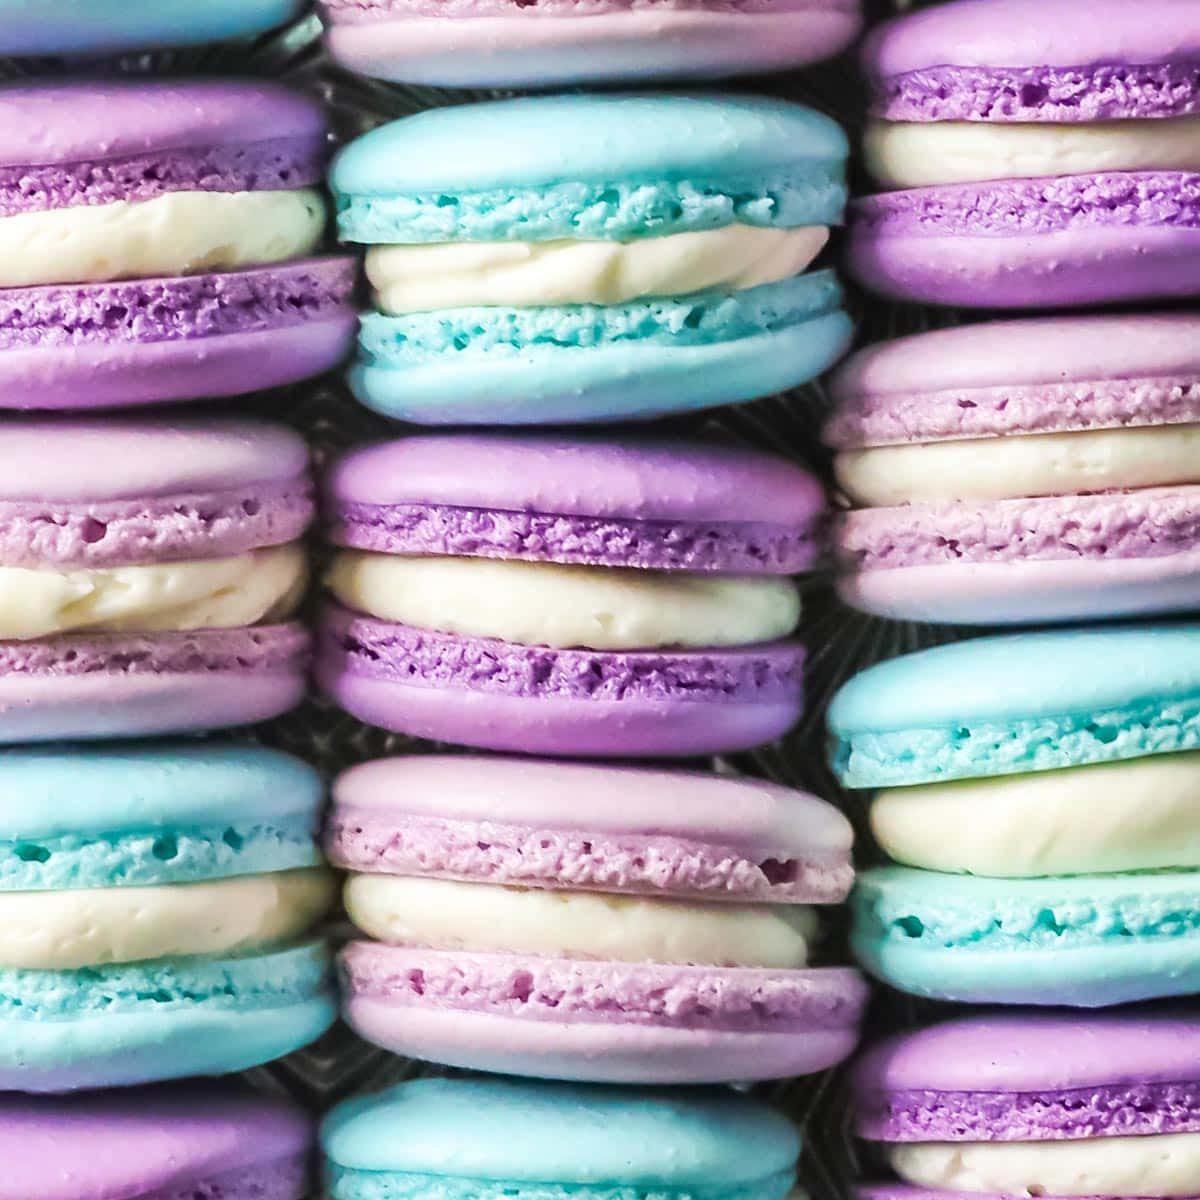
My French macaron recipe has been carefully designed for beginners and experienced bakers alike. Be sure to read through the blog post and watch the video before beginning, especially if you are a beginner. The post includes plenty of troubleshooting notes, as well.
Prep: 45min
Total: 86min
Yield: 24
Serving Size: 1 macaron sandwich cookie (excluding filling)
Nutrition Facts: servingSize 1 macaron sandwich cookie (excluding filling), calories 76 kcal, Carbohydrate 11 g, Protein 2 g, Fat 3 g, Saturated Fat 0.2 g, Sodium 20 mg, Fiber 1 g, Sugar 10 g
Ingredients:
- 150 grams super-fine almond flour ((1 ⅓ cup) see note )
- 150 grams powdered sugar (1 ¼ cups)
- 110 grams egg whites (room temperature (about 3 egg whites/110ml/just under ½ cup) see note)
- ⅛ teaspoon table salt
- pinch cream of tartar (optional (I typically use ⅛ teaspoon))
- 95 grams granulated sugar (scant ½ cup)
- 1 teaspoon vanilla extract
- Food coloring (optional)
- Your favorite frosting (see note 3)
Instruction:
- Before you begin: If you are a beginner, read through the post and watch the video before first. Ensure that all of your equipment (bowls, spatulas, beaters, etc.) are completely clean, dry, and grease free. Rubber, silicone, and plastic are not ideal for whipping meringue, so I recommend avoiding these materials and using glass or metal bowls when whipping the egg whites.
- Line 3 standard-sized cookie sheets with parchment paper and set aside.
- Sift almond flour and powdered sugar into a medium-sized mixing bowl
- Pour egg whites into a separate large, clean, dry mixing bowl. Use an electric mixer to beat on medium speed until foamy (about 30 seconds).
- Add salt and cream of tartar and stir on medium-speed for 30 seconds (it’s OK if the cream of tartar isn’t totally broken up)
- With mixer on medium-speed, add about 1 Tablespoon of granulated sugar and beat for about 30 seconds, then add the next Tablespoon. Repeat until all sugar has been added.
- Once all sugar has been added, add vanilla extract and food coloring (if using)
- Continue to beat on medium to medium-high speed until mixture reaches thick, fluffy, stiff peaks. Meringue should be thick enough that the electric beaters leave tracks in their wake. When you lift the beaters straight out of the meringue, the peaks that form should not be soft or fold over on themselves, they should hold their shape firmly and stay straight without bending.
- Add about a third of the almond flour/powdered sugar mixture to the meringue and use a spatula to fold until combined. Repeat with the next third of the mixture, and then the last.
- Continue to fold the batter, moving your spatula in sweeping motions, scraping down the sides and bottom of the bowl and cutting through the middle of the batter and turning your bowl as you go. Use your spatula smoosh the mixture against the side of the bowl periodically to help deflate it. Continue to fold until the batter flows smoothly and falls from the spatula in a smooth ribbon. You should be able to make a figure-8 with the batter and it should hold its shape for about 10-15 seconds before the edges relax back into the batter.
- Pour the batter into a large pastry bag fitted with a round tip (I like the Ateco 804).
- Pipe batter onto prepared baking sheets, holding the piping bag straight up and down and squeezing until you have 1 ½” circles of batter. Flick your wrist in a “C” motion at the end of piping each shell to complete the macaron and minimize peaks. Space macarons at least 1 ½” apart on baking sheet.
- Rap each pan very firmly on your countertop 4-5 times to release any air bubbles and preheat oven to 325F (160C).
- Let macarons rest until a skin forms on the surface (if you run the pad of your finger over the top it should feel dry and not sticky or tacky). This is typically about 30-60 minutes but may take more or less time depending on individual kitchen conditions
- Bake one tray at a time in center rack of oven for 10 minutes, turning the pan around halfway through the baking time. When finished baking, the feet should look dry and if you lightly press down on the top of a macaron it shouldn’t give.
- Allow macaron shells to cool completely before pairing off the shells and sandwiching them around your favorite frosting. For best results, allow macarons to mature in the refrigerator in an airtight container for 24 hours (and then allowing to sit at room temperature for at least 15-30 minutes before serving) before enjoying.
