Here is one of the most popular recipes The Times has ever published, courtesy of Jim Lahey, owner of Sullivan Street Bakery. It requires no kneading. It uses no special ingredients, equipment or techniques. And it takes very little effort — only time. You will need 24 hours to create the bread, but much of this is unattended waiting, a slow fermentation of the dough that results in a perfect loaf. (Weve updated the recipe to reflect changes Mark Bittman made to the recipe in 2006 after publishing and receiving reader feedback. The original recipe called for 3 cups flour; weve adjusted it to call for 3⅓ cups/430 grams flour.) In 2021, J. Kenji López-Alt revisited the recipe and shared his own tweaked version. —Mark Bittman

No Knead Bread (Overnight Version)
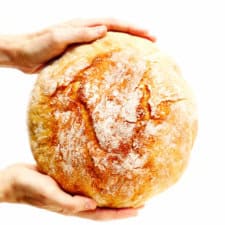
My favorite no knead bread recipe is incredibly easy to make, perfectly crusty and golden on the outside, and soft and flavorful on the inside. See notes below for an alternate faster (2-hour) version too.
Prep: 18h
Total: 18h30min
Yield: 1
Ingredients:
- 3 1/4 cups (425 grams) all-purpose flour
- 2 teaspoons fine sea salt
- 1/2 teaspoon active dry yeast
- 1 1/2 cups warm water (about 110°F)
Instruction:
- Stir together the flour, salt and yeast in a large mixing bowl until combined. Add in the warm water and stir with a wooden spoon or spatula until the dough is evenly mixed and no large flour streaks remain. (The dough will look quite loose and shaggy, which is ok.)
- Cover the bowl with plastic wrap or beeswrap, and let the dough rest at room temperature for 12 to 18 hours.
- Transfer the dough to a well-floured surface. Fold the dough on top of itself — pulling the outer edges up and into the center a few times until the dough feels a bit tighter and holds its shape — to form a round dough ball. (If the dough is sticky or feels too loose at any point, just keep sprinkling on extra flour as needed.) Lightly flour the top of the dough ball, and then carefully flip it upside-down onto a piece of parchment paper, so that the smooth side is on top. Use your hands to shape the ball into an even circle. Lightly flour the top of the dough ball, then loosely cover it with plastic wrap or beeswrap to rest while the oven heats.
- Place the Dutch oven inside of your oven*, then set oven to 450°F. Wait for 20-30 minutes for the oven to heat, while the dough continues to rest. (If the dough rises and spreads out more than you would like during this time, just use your hands to shape it into a tighter ball once more just before baking.)
- Very carefully, use oven mitts to remove the Dutch oven from the oven. (It will be extremely hot!) Lift the edges of the parchment to carefully transfer the dough ball (along with the parchment) to the Dutch oven. Cover with the Dutch oven lid and bake for 30 minutes. Then carefully remove the lid and bake for 10-20 more minutes, until the crust of the bread reaches your desired level of doneness (as light or as deeply golden brown and crispy as you prefer).
- Remove from the oven, uncover, and then carefully lift up the edges of the parchment to transfer the bread to a wire cooling rack. Cool for at least 30 minutes, then slice, serve and enjoy!
Miracle No Knead Bread

Miracle No Knead Bread! this is SO UNBELIEVABLY GOOD and ridiculously easy to make. crusty outside, soft and chewy inside – perfect for dunking in soups!
Prep: 12h
Total: 18h40min
Yield: 8
Nutrition Facts: servingSize None, calories 171 calories, Sugar 0.1 g, Sodium 438.9 mg, Fat 0.5 g, Saturated Fat 0.1 g, Trans Fat 0 g, Carbohydrate 35.9 g, Fiber 1.3 g, Protein 4.9 g, Cholesterol 0 mg
Ingredients:
- 3 cups all-purpose flour
- 1 1/2 teaspoons salt
- 1/2 teaspoon instant yeast
- 1 1/2 cups room temperature water
Instruction:
- In a large mixing bowl, whisk the flour, salt, and yeast together until mixed. Stir in the water until a chunky, thick dough forms. If it needs a little more water, add a few more tablespoons, just enough to get it barely wet throughout. It’s gonna look scrappy and weird and you’re going to question me on whether or not this will work, but it will. Cover the mixing bowl with plastic wrap and let it rest for 12-18 hours at room temperature. Overnight is ideal here, kids.
- When you’re ready to bake, preheat the oven to 450. Stick a 6 quart enamel coated cast iron Lodge Dutch Oven (or similar) in the oven for about 30 minutes to heat. At this point, the dough should be big and puffy and pretty loose, with little bubbles in it. Gently scrape the dough out onto a well-floured surface. (Remember: NO KNEAD.) Gently shape it into a ball with flour on the outside, set on a piece of parchment, and cover with plastic while your pan heats up.
- Remove the plastic from the dough. Lift the dough and parchment together into the pan so the parchment lines the bottom of the hot pan (be careful not to touch the pan since it’s very hot). Bake, covered, for 30 minutes. Remove the cover and bake another 10-15 minutes to get the exterior nice and golden brown and crispy. Voila! Done. Miracle no-knead bread, you boss you.
No-Knead Crusty White Bread
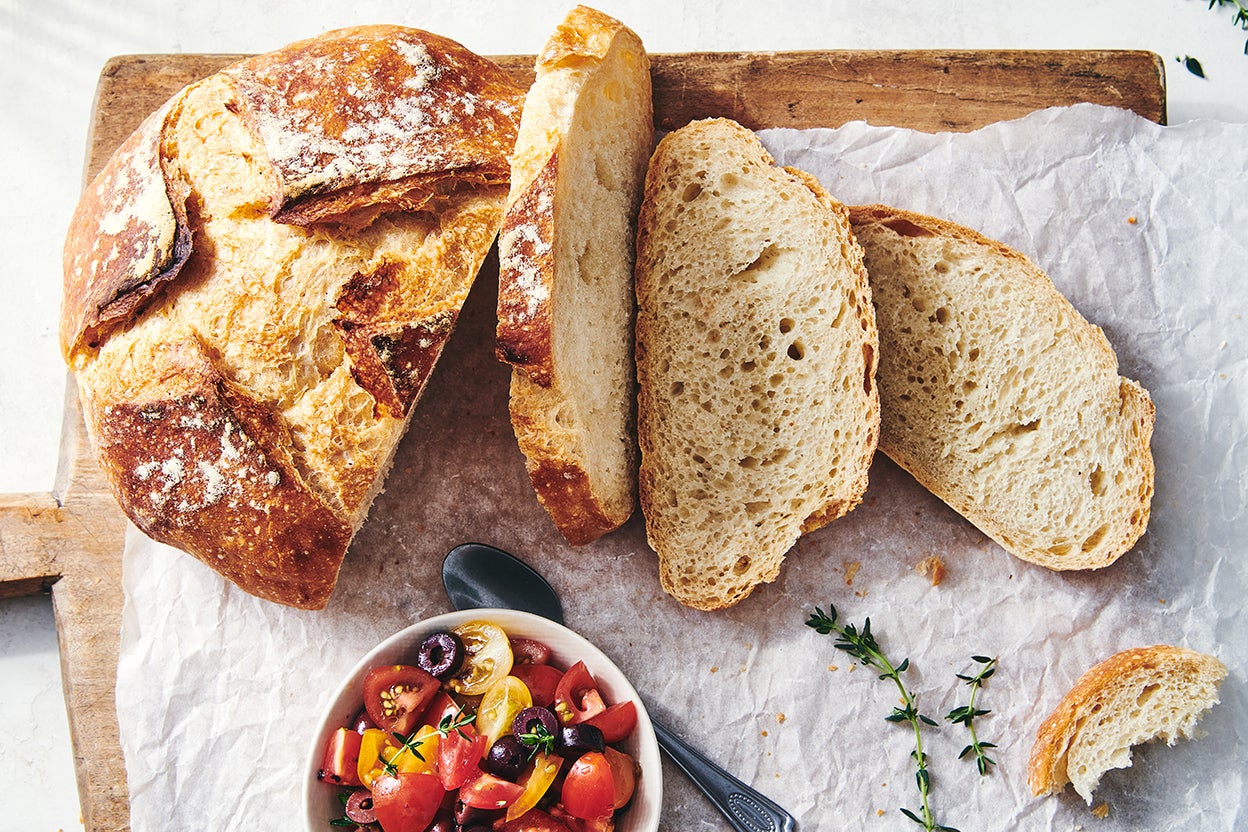
The most basic of all no-knead loaves, this is a wonderful way to get into yeast-bread baking. The easy stir-together dough rests in your refrigerator, developing flavor all the time, till you’re ready to bake. About 90 minutes before you want to serve bread, grab a handful of dough, shape it, let it rise, then bake for 30 minutes. The result? Incredible, crusty artisan-style bread, worthy of its 2016 Recipe of the Year title. Our thanks to Jeff Hertzberg and Zoë François, whose wonderful book, “Artisan Bread in Five Minutes a Day,” is the inspiration for this recipe.
Prep: 5min
Total: 5h35min
Yield: 12 per loaf
Serving Size: 1 slice
Nutrition Facts: servingSize 1 slice, calories 100 cal calories, Carbohydrate 20g, Cholesterol 0mg, Fiber 1g, Protein 4g, Sodium 220mg, Sugar 0g, Fat 0g, Saturated Fat 0g, Trans Fat 0g
Ingredients:
- 7 1/2 cups (900g) King Arthur Unbleached All-Purpose Flour
- 3 cups (680g) water lukewarm
- 1 tablespoon (18g) salt
- 1 1/2 tablespoons (14g) instant yeast or active dry yeast
Instruction:
The flour/liquid ratio is important in this recipe, so measure carefully. Your best bet is to weigh the flour; or measure it by gently spooning it into a cup, then sweeping off any excess. , Combine all of the ingredients in a large mixing bowl, or a large (6-quart), food-safe plastic bucket. For first-timers, “lukewarm” means about 105°F, but don’t stress over getting the temperatures exact here. Comfortably warm is fine; “OUCH, that’s hot!” is not. Yeast is a living thing; treat it nicely., Mix and stir everything together to make a very sticky, rough dough. If you have a stand mixer, beat at medium speed with the beater blade for 30 to 60 seconds. If you don’t have a mixer, just stir-stir-stir with a big spoon or dough whisk until everything is combined., Next, you’re going to let the dough rise. If you’ve made the dough in a plastic bucket, you’re all set — just let it stay there, covering the bucket with a lid or plastic wrap; a shower cap actually works well here. If you’ve made the dough in a bowl that’s not at least 6-quart capacity, transfer it to a large bowl; it’s going to rise a lot. There’s no need to grease the bowl, though you can if you like; it makes it a bit easier to get the dough out when it’s time to bake bread., Cover the bowl or bucket, and let the dough rise at room temperature for 2 hours. Then refrigerate it for at least 2 hours, or for up to about 7 days. (If you’re pressed for time, skip the room-temperature rise, and stick it right into the fridge). The longer you keep it in the fridge, the tangier it’ll get; if you chill it for 7 days, it will taste like sourdough. Over the course of the first day or so, it’ll rise, then fall. That’s OK; that’s what it’s supposed to do., When you’re ready to make bread, sprinkle the top of the dough with flour; this will make it easier to grab a hunk. Grease your hands, and pull off about 1/4 to 1/3 of the dough — a 400g to 540g piece, if you have a scale. It’ll be about the size of a softball, or a large grapefruit., Plop the sticky dough onto a floured work surface, and round it into a ball, or a longer log. Don’t fuss around trying to make it perfect; just do the best you can., Place the loaf on a piece of parchment (if you’re going to use a baking stone); or onto a lightly greased or parchment-lined baking sheet. Sift a light coating of flour over the top; this will help keep the bread moist as it rests before baking. Drape the bread with greased plastic wrap, or cover it with a reusable cover., Let the loaf warm to room temperature and rise; this should take about 60 minutes (or longer, up to a couple of hours, if your house is cool). It won’t appear to rise upwards that much; rather, it’ll seem to settle and expand. Preheat your oven to 450°F while the loaf rests. If you’re using a baking stone, position it on a middle rack while the oven preheats. Place a shallow metal or cast iron pan (not glass, Pyrex, or ceramic) on the lowest oven rack, and have 1 cup of hot water ready to go., When you’re ready to bake, take a sharp knife and slash the bread 2 or 3 times, making a cut about 1/2″ deep. The bread may deflate a bit; that’s OK, it’ll pick right up in the hot oven., Place the bread in the oven — onto the baking stone, if you’re using one, or simply onto a middle rack, if it’s on a pan — and carefully pour the 1 cup hot water into the shallow pan on the rack beneath. It’ll bubble and steam; close the oven door quickly., Bake the bread for 25 to 35 minutes, until it’s a deep, golden brown., Remove the bread from the oven, and cool it on a rack., Store leftover bread in a plastic bag at room temperature. For longer storage options, see our blog post, Freezing no-knead bread dough, for details.
ARTISAN BREAD | NO KNEAD BREAD | Homemade Dutch Oven Bread | Crusty Bread |4K| Juicing Peaches
FAQ
What is the disadvantage of no-knead bread?
What is the point of no-knead bread?
What are the pros and cons of no-knead bread?
What makes no-knead bread different from bread?
